Server requirements
- PHP: 8.0+ (recommended 8.1/8.2)
- Extensions: PDO MySQL, cURL, JSON, mbstring, OpenSSL, and zip (ZipArchive) if you use the in-app updater
- Database: MySQL / MariaDB
- HTTPS: recommended for production
- Writable paths:
storage/(see below)
Installation
Download the free package from seoscope.cloud/seoscope.zip, then choose your hosting panel and follow the step-by-step guide.
Installation on Plesk (step-by-step)
Follow the video and then the checklist below (Plesk-specific steps plus common SeoScope steps).
-
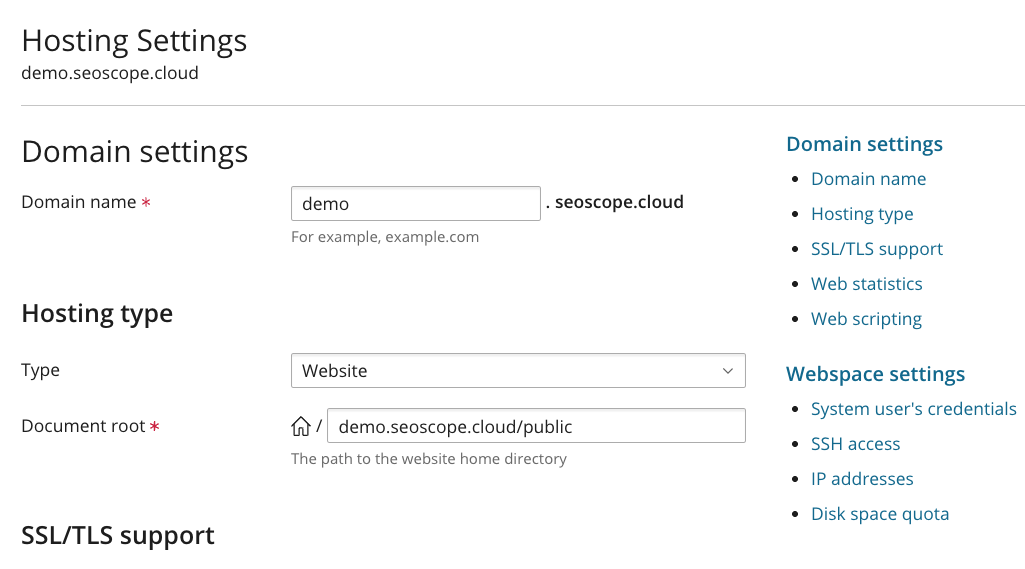
Domain / subdomain + document root =
public(Plesk)Video: Plesk installation walkthrough.
- Create/select the domain or subdomain in Plesk.
- Open Hosting Settings (or Apache & nginx Settings) and set Document root to the SeoScope
publicfolder (the one that containsindex.php).
-
Upload the ZIP + extract (Plesk)
- Open Files for the subscription and upload the SeoScope ZIP (from seoscope.cloud/seoscope.zip) into the site folder.
- Use Extract so the application folders (including
public/) exist on disk.
-
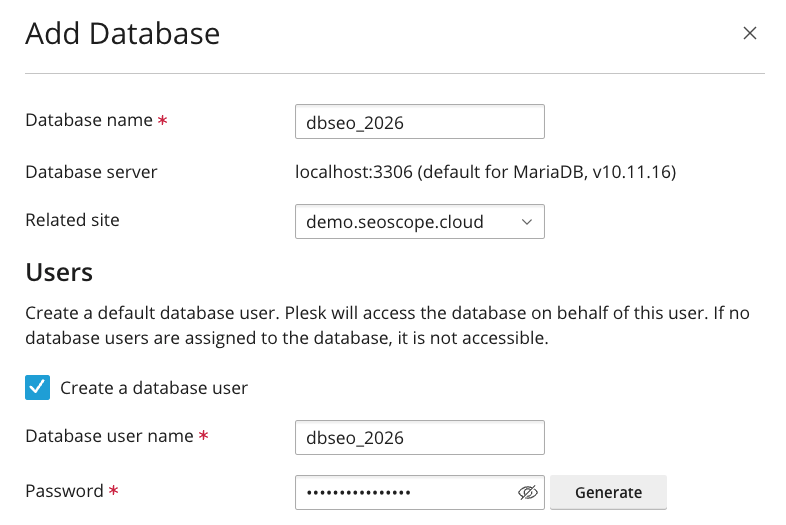
Create the database (Plesk)
- Databases → Add Database → create a MySQL/MariaDB database.
-
Create the DB user + privileges (Plesk)
- Create (or select) a database user and grant privileges to the database.
- Note host (often
localhost), port (often3306), database, username, password.
-
Run the installer + first login
- Open your site in the browser and start the installer (or visit
/install/index.php). - Enter DB host/port/name/user/password, then create the admin account.
- After install completes, sign in with the admin account you created and continue with Google setup below.
Security after install: once setup is complete and you can log in, delete the uploaded ZIP archive and remove theinstall/directory from the server. - Open your site in the browser and start the installer (or visit
-
Create OAuth JSON (Google Cloud)
- Create a new project (or use an existing one) in Google Cloud Console.
- Enable Google Search Console API.
- Configure the OAuth consent screen and publish the app if required.
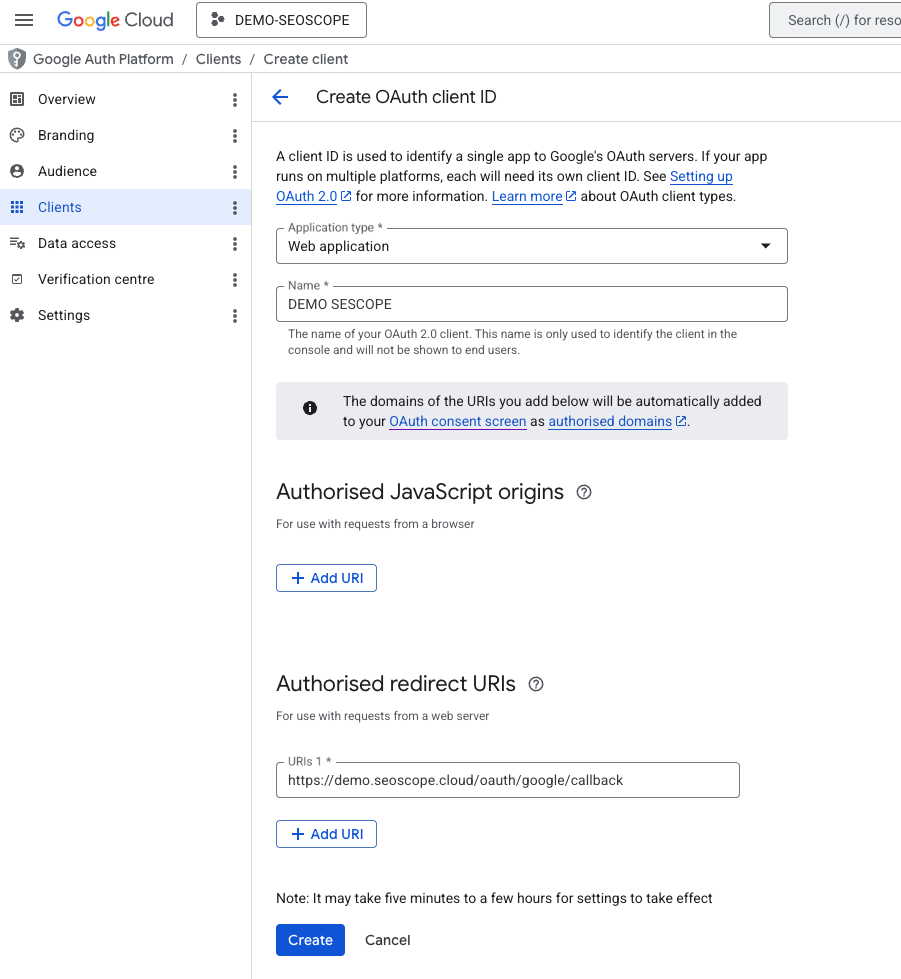
- Create credentials: OAuth client ID → Web application.
- In SeoScope, copy the exact Redirect URI shown in
Settings → Googleand paste it into Authorized redirect URIs.
- Download the client JSON.
-
Upload JSON + connect Google (SeoScope)
- Open
Settings → Googlein SeoScope. - Upload the OAuth JSON (or paste Client ID/Secret) and click Connect Google.

- Open
-
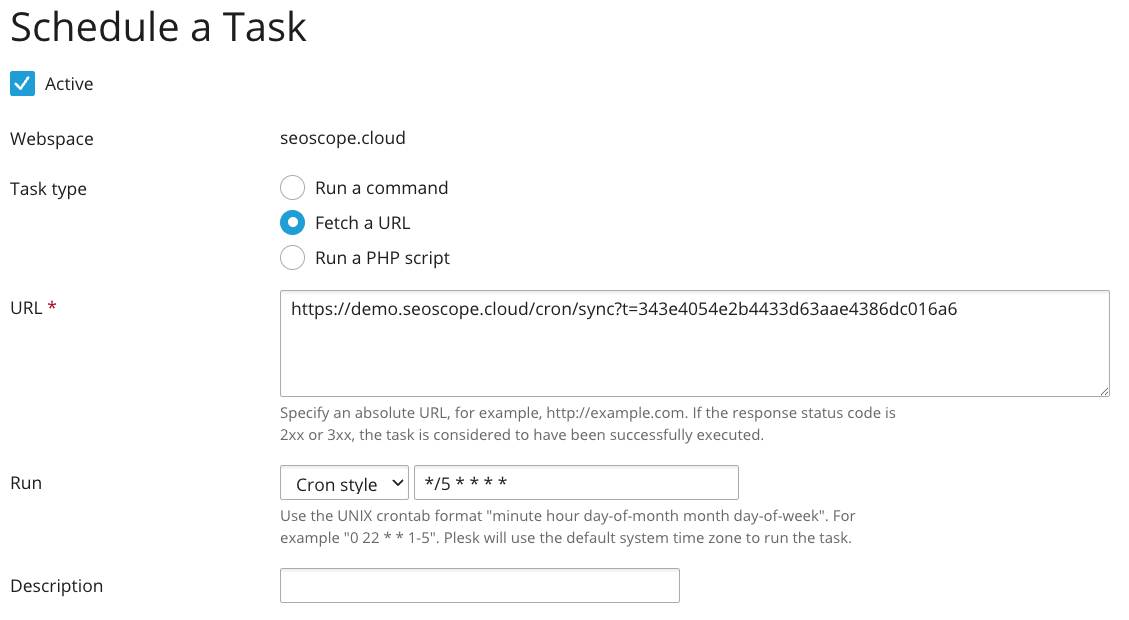
Create the cron (Plesk)
- In SeoScope open
Settings → Automationand copy the Cron URL shown there. - In Plesk: Tools & Settings (or Domains → subscription) → Scheduled Tasks → Add Task.
- Choose Fetch a URL (HTTP GET) and paste the Cron URL.
- Schedule every 5–10 minutes (for example
*/5 * * * *). Use only one scheduler for that URL (HTTP 409 means a run is already in progress).
- In SeoScope open
-
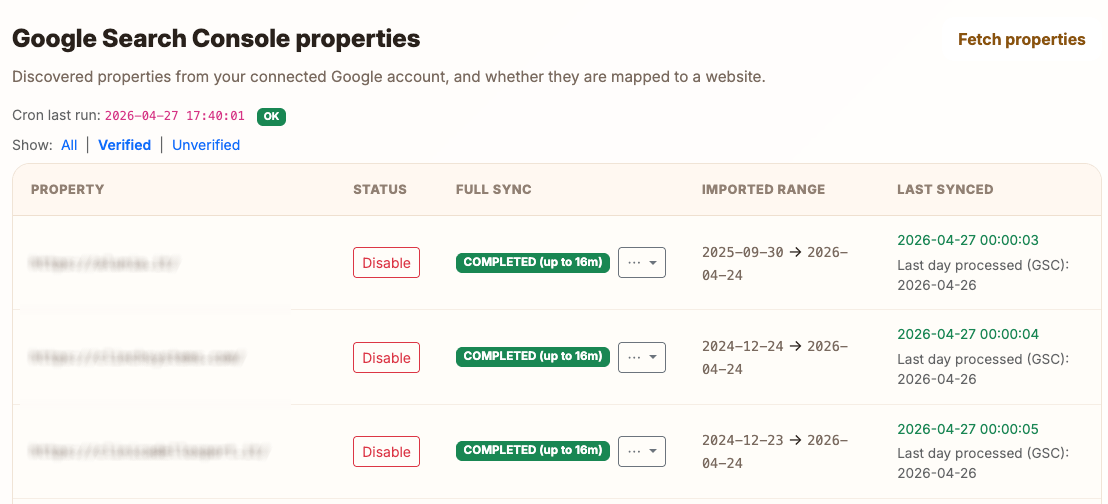
Fetch properties + enable what you need (SeoScope)
- Go to Websites (or
Projects) and click Fetch properties. - Enable the properties you want to analyze and let the cron run the first sync.
- Go to Websites (or
Installation on cPanel (step-by-step)
Follow the video and then the checklist below (cPanel-specific steps plus common SeoScope steps).
-
Domain / subdomain + document root =
public(cPanel)Video: cPanel installation walkthrough.
- Create the domain/subdomain in cPanel (labels vary: Domains, Subdomains, Create A New Domain).
- Set the domain’s document root to the SeoScope
publicfolder (must containindex.php).
-
Upload the ZIP + extract (cPanel)
- Open File Manager and upload the ZIP (from seoscope.cloud/seoscope.zip) to the target site folder.
- Extract it so
public/,app/,config/,install/exist on disk.
-
Create the database (cPanel)
- Use MySQL® Databases (or MySQL Database Wizard) to create a database.
-
Create the DB user + privileges (cPanel)
- Create a DB user and Add User To Database with ALL PRIVILEGES.
- Note host (often
localhost), port (often3306), database, username, password.
-
Run the installer + first login
- Open your site and run the installer (or visit
/install/index.php). - Enter DB host/port/name/user/password, then create the admin account.
- After install completes, sign in with the admin account you created and continue with Google setup below.
Security after install: once setup is complete and you can log in, delete the uploaded ZIP archive and remove theinstall/directory from the server. - Open your site and run the installer (or visit
-
Create OAuth JSON (Google Cloud)
- Create a new project (or use an existing one) in Google Cloud Console.
- Enable Google Search Console API.
- Configure the OAuth consent screen and publish the app if required.
- Create credentials: OAuth client ID → Web application.
- In SeoScope, copy the exact Redirect URI shown in
Settings → Googleand paste it into Authorized redirect URIs.
- Download the client JSON.
-
Upload JSON + connect Google (SeoScope)
- Open
Settings → Google, upload OAuth JSON (or paste Client ID/Secret), then click Connect Google.
- Open
-
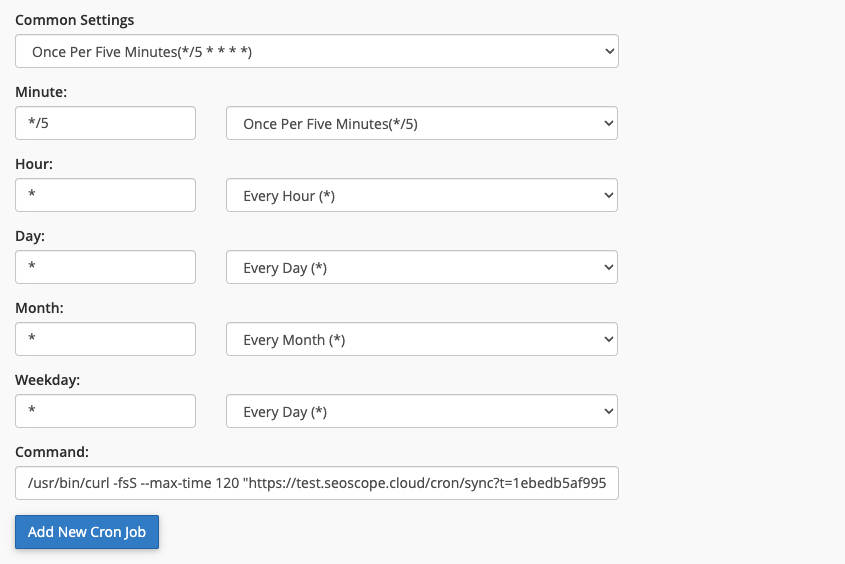
Create the cron (cPanel)
- In SeoScope open
Settings → Automationand copy thecurlcommand shown there. - In cPanel: Cron Jobs → Add New Cron Job.
- Schedule every 5 minutes (e.g.
*/5 * * * *) and paste the command in the Command field.
- If quoting fails, use single quotes around the URL inside
curl.
- In SeoScope open
-
Fetch properties + enable what you need (SeoScope)
- Go to Websites (or
Projects) and click Fetch properties. - Enable the properties you want to analyze and let the cron run the first sync.
- Go to Websites (or
App features (overview)
SeoScope turns Google Search Console performance data into structured SEO reports: headline KPIs, sortable tables, drill-downs between queries and landing pages, and rule-based opportunity lists. You work inside a single property (Search Console site or URL-prefix) at a time, with shared filters so KPIs and detail tables stay consistent as you move between screens.
Dashboard headline metrics and daily trends for the whole property are aligned to the Search Console Search Analytics API (web search) using the same request options the GSC web UI relies on, including how recent days are treated while Google finalizes data. Rare, tiny differences between the API and the on-screen GSC numbers can still occur on Google’s side.
Reports (Search Console–based)
The reports below read from the same filtered dataset whenever the underlying aggregates exist. Open column headers to sort; use row actions or detail panels to move between query-centric and URL-centric views.
- Quick Win A consolidated opportunity view that ranks suggestions by impact: queries in striking distance (strong impressions, improvable average position), CTR gaps versus expected benchmarks, pages that earn impressions but underperform on clicks, and topical gaps you can close with new or expanded content. Thresholds and sensitivity for several signals are configurable in settings, so you can tune the list from “strict, high-confidence” to “broad exploration” without changing your raw Search Console data.
- Keywords The primary query table: search queries with clicks, impressions, average CTR, and average position for the active filters. Sort by any column, use in-table search where provided, and open a query to see which landing URLs received clicks for that term. Detail panels (where implemented) expose extra JSON-oriented facts for the same query so you can validate the story behind the aggregate row.
- Pages The inverse of Keywords: start from landing page URLs and inspect which queries delivered impressions and clicks to each URL. Ideal for diagnosing thin pages, winners you should reinforce, and URLs that rank but rarely convert clicks. Drill from a URL into its query set to decide whether to merge pages, improve titles, or adjust internal links.
- Cannibalization Surfaces query–URL clusters where more than one URL on your site competes for overlapping intent. That split can dilute CTR, confuse users, and make rankings unstable. Use it to plan canonicals, redirects, content merges, or clearer differentiation between pages that should target distinct intents.
- Long tail Emphasises longer, lower-volume query variants rather than head terms alone. Useful for topical expansion, supporting articles, and internal linking programmes that would be invisible in a head-only keyword list. Combine with date and country filters to see how tail demand shifts by market or season.
- Question queries Filters the query set to question-shaped searches (who, what, how, why, …). These often map to FAQ blocks, how-to articles, comparison pages, and voice-oriented answers. Pair with the Pages report to see which URLs already capture those questions and where new content could fill gaps.
- Decay Highlights queries, pages, or sessions whose clicks, impressions, or positions have declined versus a comparison window, according to decay rules you configure (magnitude and persistence of the drop). Helps separate one-off volatility from sustained losses that deserve technical SEO, content refresh, or SERP feature investigation.
Data export
- CSV exports Most tabular reports expose a CSV download so you can archive results, share them with stakeholders, or pivot further in a spreadsheet. Exports generally reflect the same filters (property, dates, device, country) visible on screen at export time. Typical exports include keyword and page listings and Quick Win opportunity tables. Open the export action from the report toolbar where it is offered; files are UTF-8 text suitable for Excel, Google Sheets, or BI tools.
Interface language & translations
The product ships with English as the only built-in interface language. In Settings → Interface you can add more languages and select the active one (see below).
Adding a new language (per installation)
Use the Additional languages block on the same settings tab. You can register a new two-letter code (e.g. es, de) with a display name, then:
- Download template — you receive a JSON file listing every string key and its English value, generated from the product catalogue. Use it as the basis for your translation file.
- Translate the values. Keep the keys exactly as in the file. Placeholders such as
:nameor:datemust stay in the translated text where the app expects them. - Upload the JSON. It is stored under
storage/lang/on your server. The web server user must be able to create and write that folder (if adding a language fails, fix directory permissions first). - Choose the new language in Interface language and save. SeoScope falls back to English for any key you have not translated yet.
After a product update, new or changed English strings may appear. Download a fresh template, merge your translations, and upload again so your language file stays complete.
Updates and storage/: the in-app updater never overwrites the storage/ tree, so your uploaded translation files are kept across upgrades.
The standard free ZIP includes the English UI catalogue only.
Updates
New versions of SeoScope are published on seoscope.cloud.
Download the current package from https://seoscope.cloud/seoscope.zip
(see also releases.json for the listed version).
The archive is the same type used for a fresh installation; your server already has configuration and data you must keep.
1. What you need before you start
- Official package only: use the ZIP from seoscope.cloud/seoscope.zip. Do not use third-party mirrors or re-packed archives; the in-app installer validates the structure of the product.
- Backups (your responsibility): the in-app update does not create database dumps or a full file backup. Before updating, make a database backup (e.g. phpMyAdmin, hosting panel, or
mysqldump) and, if you use custom deploy workflows, a copy ofconfig/local.phpand thestorage/tree. If an update fails or you need to roll back, restore from that backup. - PHP: Zip extension: the in-app installer requires the PHP zip extension (
ZipArchive). If the Update screen reports that zip is missing, enableext-zipin your hosting PHP configuration or use the manual method below. - Upload size limits: the ZIP is uploaded through your browser. PHP settings
upload_max_filesizeandpost_max_size(shown on the Update settings tab) must be larger than the ZIP file. If the upload fails with a size or HTTP error, ask your host to raise those values (e.g. 32M, 64M, or 128M depending on package size) or update via FTP using the manual procedure. - Who can run the update: only a signed-in admin can open
Settings → Updateand submit the form; requests are protected with CSRF.
2. In-app update — step by step (recommended)
This is the path intended for end users: no FTP is required, but you must still follow backups and good hosting limits as above.
- Log in to the SeoScope admin panel.
- Open
Settingsand select the Update tab (the label may be “Update” or “Aggiornamento” depending on language). - Review the Installed version (taken from the live app). Optionally, the page may show a latest listed version read from a public JSON file on
seoscope.cloud— this is informational only. If the website cannot be reached, you can still install by uploading a ZIP you previously downloaded from seoscope.cloud; the only hard requirement is that the version inside the ZIP is newer than your current install. - Download the latest full product ZIP from seoscope.cloud/seoscope.zip to your computer.
- On the Update tab, use Choose file and select that ZIP, then click Install from ZIP (or the equivalent label).
- Wait until the process completes. On success, the UI shows a message with the new version number and an approximate count of files that were added or replaced.
- Open the Dashboard or refresh the app once. The application runs database migrations when needed, so the schema stays aligned with the new code.
3. How the installer decides what to install
- Version check: the ZIP must contain
app/Version.php. TheVERSIONstring inside the package is compared to your currently installed version using PHPversion_compare. The update is applied only if the package version is strictly greater than the running installation. Re-uploading the same version, or an older one, is rejected with an error (for example, you must use a ZIP that matches a newer release from seoscope.cloud). - Layout of the archive: the ZIP is expected to look like a normal product tree: a root folder with
public/index.phpandapp/Version.php, or a single top-level folder in the archive that contains those paths. If the tool cannot find that layout, the upload is rejected for safety. - What is copied: files from the package are copied on top of your installation. New files are created as needed. Existing application files in
app/,public/,lang/,config/(see exceptions below),database/,vendor/, etc. are overwritten when the new package contains a matching path.
4. What is never touched by the in-app update
The following are always skipped so your environment and customer data stay intact:
config/local.php— your database credentials, app URL, and other local settings.- The entire
storage/directory tree — including sessions, cache, logs, locks, custom JSON languages, and any other files the runtime keeps understorage/.
If a future release needs new empty subfolders under storage/, the application can create them on first use; your existing files in storage/ are not replaced from the ZIP.
5. What happens on the server after a successful in-app update
- Replaced/added application files are written to disk (respecting the skip rules above).
- If the server uses OPcache for PHP, a reset may be triggered so the new code is picked up on the next requests.
- Database migrations are executed as part of the same update flow, so the database structure generally matches the new version without a separate “migrate” step.
6. Limitations you should be aware of
- No automatic backup: as already stated, plan your own database and file backups before updating.
- “Overlay” behaviour: the installer does not delete old application files that were removed from the product in a newer release. In rare cases, an obsolete file could remain on disk until you or your host remove it. Fresh installs or a careful manual clean-up on major upgrades are options for advanced users.
- Custom edits inside the vendor tree: if you manually modified files under
app/orvendor/, those local edits can be overwritten by the new package. Prefer configuration throughconfig/local.phpand documented extension points, not direct edits to core files you expect to keep across updates.
7. Optional: “latest version” line and releases.json
SeoScope can fetch a small public JSON file to display the latest version number and an optional changelog / documentation link. The default URL is https://seoscope.cloud/releases.json. This request carries no credentials, domain, or personal data. If the file cannot be read (firewall, DNS, downtime), the Update screen still works: you only need the correct ZIP from seoscope.cloud/seoscope.zip.
An optional override is available in config/local.php for advanced deployments:
return [
  // ...
  'update' => [
    'releases_url' => 'https://seoscope.cloud/releases.json',
  ],
];
The author updates releases.json on each public release; your installation does not need to be changed when that file changes.
8. Manual update (FTP / SFTP / file manager)
Use this method if the ZIP is too large for HTTP upload, if ext-zip is unavailable, or you prefer file-level control.
- Back up the database and important files (see above).
- Download the latest SeoScope ZIP from seoscope.cloud/seoscope.zip to your computer and extract it locally (or on the server in a temporary directory, not on top of the live site first).
- Upload and overwrite application directories from the new package, typically including
app/,public/(do not break your document root),lang/,database/,vendor/, and the non-local files underconfig/if they ship with the product. - Do not overwrite
config/local.phpor the contents ofstorage/. - In the browser, open your SeoScope site so that migrations run. If anything looks wrong, restore from your backup.
Always read the changelog shipped with the release for any special notes (e.g. one-time extra steps, minimum PHP version changes).
Troubleshooting
- 500 error: check PHP error logs and ensure required extensions are enabled.
- Login/session issues: ensure
storage/sessionsis writable. - Google connect fails: verify OAuth credentials and redirect URL.
Update-specific issues
- “Package is not newer” (or same version): you are not using a ZIP that is strictly newer than the version already installed. Download again from seoscope.cloud/seoscope.zip and ensure a newer package was published; compare with the Installed version on
Settings → Update. - Upload failed / file too big: increase
upload_max_filesizeandpost_max_sizeinphp.ini(or the hosting control panel) above the size of the ZIP, or use the manual update. - Not a SeoScope package / invalid zip: the file must be the unmodified product archive with
public/index.phpandapp/Version.phpin the expected layout. Re-download the official ZIP; do not upload random archives or nested repacks with an extra top folder that does not match the documented structure. - Write errors / could not copy: check that the web server user can write to the application directories, that the disk is not full, and that
open_basedir(if enabled) still allows the install path. - Zip / ZipArchive missing: enable the PHP zip extension, or use a manual file replacement.
Security & outbound connections
SeoScope performs outbound requests only for:
- Google OAuth / Google Search Console APIs (to fetch your Search Console data).
- Optionally, a one-way request to
seoscope.cloud/releases.json(no credentials) to show whether a newer product version is listed; you can still update without that check by uploading a ZIP from seoscope.cloud/seoscope.zip.
No credentials are hardcoded in the distributed package. Your local environment configuration is stored in config/local.php after installation.
Support
For help with installation and configuration, start with this documentation and the live demo. Product updates and the free package are published on seoscope.cloud (download ZIP).